News
The Advantages Of Online Sewing Shops From Christchurch And Beyond
Your 7-Step Guide To Choosing The Right Sewing Machines
The Basics of Sewing Thread
Troubleshooting Your Sewing Machine
How to Set Up & Maintain Your Sewing Machine
Getting Started with Your Sewing Machine
Whether we aim to express ourselves creatively, darn an old shirt or alter a dress to perfection, there is nothing better than sitting down with a new sewing machine! If you’ve recently started - or you’re getting back into it after a break - follow our handy guide to setting up and maintaining your sewing machine.
We’ve got great news! Domestic sewing machines have become so user-friendly that almost anyone can use them and with practice become an expert at various stitches, dishing out beautiful designs and patterns. If you have a liking for stitching, dress designing, quilting, or simply like to add a special touch to your linen, it’s never too late to pick up a new hobby!
In this guide, we show you how to set up a sewing machine and detail all the basic steps involved. We also look into how you can maintain your sewing machine in top condition so that it delivers the results year after year. So, let’s get started already!
How to Set Up a Sewing Machine
If you are reading this, it is most likely that you have already bought a sewing machine and are staring at the contents just out of the box and wondering where to get started. No worries, let’s take it one step at a time.
Go through the Paperwork
In the box, you will find a number of papers that come along with your purchase. Most importantly, you will find a user’s manual, detailing the various parts of the machine and giving you instructions on how to use it. Make sure that you are sitting at the machine when you read this manual.
You will also find the registration and warranty forms. Do not forget to log in to the website mentioned in this form and register for the manufacturer’s warranty. We know it’s not exciting, but keep these in a safe place so you have all the information about your machine together.
If you have a second hand machine and do not find a user’s manual, you can always apply for it online by going to the manufacturer’s website and requesting it. You will need to feed in the name of your machine and the model number. That done, let’s move on to the next step.
Attach the Foot Pedal to the Machine
Once you are plugged in and switched on, it’s time for the fun to start! Next to the power output, you will find the socket for the foot pedal cord. Look for this cord in the box, and connect one end of it to the machine and the other to the foot pedal. You can then go ahead and press the pedal to see how well it works.

Insert the Needle
Moving on, we will learn how to insert a needle in the machine. You can choose a regular point or universal needle which works well on light and medium weight fabrics.
So how do we go about it? Start by lowering the presser foot and hold the needle with the flat side facing the back of the sewing machine. Then go ahead and push the needle up the needle clamp and tighten the needle clamp. Once the needle clamp is properly tightened, we can proceed to wind the bobbin and thread the machine.
How to Wind and Insert the Bobbin in the Sewing Machine?
To wind the bobbin, open the user’s manual and look into the procedure detail. You will have to place a spool of thread on the spool pin, pull the thread through the thread guides and wrap it around the tension disk.
You can then insert the end of the thread into the bobbin,
set the bobbin on the winding spindle, and lock it into place. Then go ahead and step on the foot pedal to get the bobbin spinning. In this way, the thread will evenly wind on the bobbin. Once wound, the bobbin can be removed and inserted into the sewing machine.
Most machines come with a top-loading bobbin. To insert the bobbin, raise the presser foot and make sure that the needle is in the highest position by using the handwheel. You can then go ahead and remove the bobbin cover plate on the top side of the machine and place the bobbin in the bobbin case.
You can then follow the steps on the user’s manual for pulling the thread through the various thread channels. Make sure you leave a tail of 4-5 inches and then shut the bobbin cover plate.
How to Thread a Sewing Machine?
Most sewing machines have two threads that work together to form the stitches. One thread comes from the bobbin and the other from the spool on the top of the machine and goes through the eye of the needle.
Start by turning off the machine and raising the presser foot. Then go ahead and raise the needle to its highest position by turning the handwheel. Place the thread on the spool pin and draw it through the thread guides as mentioned on the user’s manual, bringing it down to the needle. You can then pass the thread through the eye of the needle.
Once that is done, draw the thread from the bobbin through the needle plate and under the presser foot. You can then lower your presser foot and your threading is complete.

How to Maintain a Sewing Machine
How to Clean a Sewing Machine?
If you’ve been using the machine for a while, it’s time to think about cleaning. To start out cleaning your sewing machine, unplug it and remove the throat plate. Check on your manual how to get the throat plate off as some machines require it to be unscrewed by using a screwdriver while others simply slide off.
Once you have opened the throat plate, you will find dust and fabric fibres that have gathered inside. You can take a nylon brush and dust these parts slowly to remove all dirt gathered in the nooks and corners. You can also dust the bobbin case and inside and in-between the feed dogs.
How to Oil a Sewing Machine?
With the cleaning thoroughly done, you can go ahead and oil the machine. Make sure that you use sewing machine oil as it is specially formulated to keep your machine in good order.
Move the handwheel up and down and see which parts of the machine are touching each other, creating friction or making a creaking sound. These are the parts that need oiling. Make sure that you put only a few drops of oil in each place.
Then go ahead and move the handwheel a couple of times to work the oil in. Use a piece of muslin cloth to wipe off any additional oil and give your machine a nice final wipe with a clean soft cloth.
Sewing Machine Service & Repair
No matter how well you set up and maintain your machine, we understand that things do go wrong. That’s why we offer servicing and repair for domestic and industrial sewing machines.
We’re based in Auckland and have over 30 years of experience selling and servicing machines around NZ. No matter what issue you’re facing, we can get you the help you need.
Please contact us today and we’ll be in touch to help:
https://www.directsewing.co.nz/pages/machine-service-request
What is the Best Embroidery Machine for a Small Business?
Embroidery as a Business
Embroidery designs have remained popular through the decades and have become a signature of exceptional style and elegance. Today, the commercial embroidery business is a $47 billion per year marketplace, and the niche for private entrepreneurs has been expanding drastically.
What’s even better; if you’re seeking to exercise your creative instincts and make money at the same time, then you might consider mixing your passion with profession, and starting a home-based embroidery business.
Whether you’re embarking upon your embroidery-based journey from the spare bedroom or planning to operate from a garage, it can be a very profitable move with no overheads involved. All you need is a handful of fabric and a commercial embroidery machine; and thankfully, the machinery has never been more affordable.
In this blog post, let’s take a sneak peek into starting an embroidery business from scratch and explore the best embroidery machines for businesses, with pros, cons, reviews, and personal experiences.
Why Start an Embroidery Business?
Embroidery is a popular art practiced by people all over the world. That's why it comes as no surprise that turning this much-loved needlecraft into a business can be fun and rewarding!
Just imagine if you can go to work every day with a sheer passion for your work, can you really consider that as work? Finding something that you genuinely have a passion for and then working towards it is something that a lot of people can only dream of.
Second of all, starting your own home embroidery business does not require a lot of time or space. As good as it sounds, a small embroidery machine for business takes up very little space, and once it’s installed, you only need some space to do the work and to store fabric.
What’s even better; embroidery materials are much cheaper than other businesses. In fact, embroidering an average design costs only as little as $0.16 — including the total cost price of thread, stabilizer, needles, and bobbin!
On top of it all, it is the profitability of the industry that is your biggest opportunity. Customers can be found everywhere. More and more people and businesses are turning to embroidered merchandise such as jeans, handbags, and other creative wearables to bolster brand identity or to assert a strong brand presence in fashion and boutique markets.
What Embroidery Equipment Will You Need?
To get started turning your passion into an embroidery home business, you’ll need an embroidery machine, which makes the largest investment in your business.
Your embroidery machine will be your money maker and you do not want to skimp on this piece of equipment. Choosing the wrong equipment cannot only hurt your finances but also cost your business operationally. That’s why the equipment side of your business is the area that must be researched thoroughly!
What’s more; you’ll also need access to a computer and a printer to digitize or outsource your embroidery designs. And if you choose to work with more intricate and complex designs, you’ll need digitizing software that helps you achieve professional and avant-garde design standards.
How to Choose a Commercial Embroidery Machine for your Business?
So, finally, we have arrived at the point when we will take a sneak peek at some key factors to consider before purchasing your perfect commercial embroidery machine. Remember as important is the decision to start your own embroidery business, as much you will need to pay attention to the main features of your key equipment.
Hoop Size
One of the most important factors to consider when choosing an embroidery machine for business is the size of the hoop. The larger your design size is, the larger the size of the hoop you will need.
Please note that most embroidery machines for business will offer 4 x 4 inches hoop-delivery to start with; however, some machines may not have room for more. If you're looking to stitch a t-shirt, for example, then you might want to consider a larger hoop option at 5x7 inches or 7 x 12 inches.
Stitches per minute
Time is money and there is nothing more important than this when you’re working at your own home business. When you have projects to be completed as soon as possible, your machine needs to be able to work at speed— saving you both time and money! That's why it is important to choose a machine that offers at least 700 stitches per minute and can reach higher speeds when embroidering.
LCD Screen
While an LCD display tends to come standard across all the embroidery machines, the size of this screen matters a great deal. A larger size of the screen, for example, will not only make it easier for you to place the design perfectly, but it will also help you monitor metrics of the ongoing embroidery.
Pro Tip: A smaller LCD screen would arguably reduce the cost of the embroidery machine; however, it can get quite difficult to use a small touchscreen, especially when you have to process large batches of designs.
Seamless Connectivity
To help the design processes work optimally, the makers load the embroidery machines with a USB port that allows for easy connectivity with other like-minded machines. With the advancement in technology, you can also expect machines with SD card sockets that are much more useful.
Pro Tip: The latest models are also loaded with the direct PC link, which works seamlessly to create real-time alterations, in addition to making different file formats easier to put into practice.
Which Embroidery Machine is best for Home Business?
Now, that we have walked through the main factors to look for in embroidery machine for a home-based business, let us review the best commercial embroidery machines on the market:
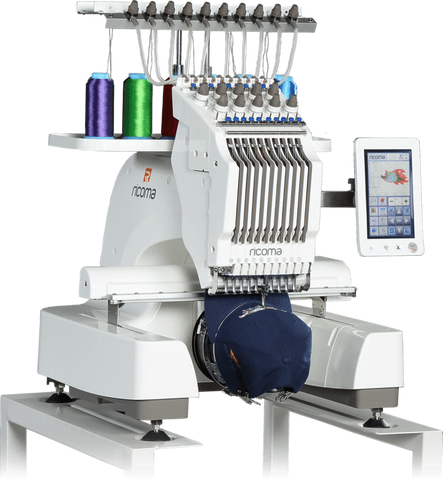
Ricoma EM-1010
-
Heads 1
-
Needles per head 10
-
Maximum stitches 1000 SPM
-
Maximum embroidery area 310 by 210 mm
-
Control Panel 7-inch HD LCD touchscreen panel
-
Number of hoops 4
Bring your vision to life with the Ricoma EM-1010, a 10-needle machine that makes even the most complex, multicolor designs a walk in the park. With four different sized hoops, this single-head entry-level embroidery machine is perfect for both starters and professionals. From baby clothing and tees to polo and robes, the lightweight machine is the ideal choice for all your embroidery projects.
Yet another perk of EM-1010 is the user-friendly and energy-saving 7-inch HD LCD touchscreen panel with easy to use icons and operations in 14 different languages. You can make any adjustments and edits to your design and even personalize using the machine’s ten different in-built fonts, 20,000 embroidery designs, and 200 more that you can load.
To make designing easier, a simplified rotating control arm is enabled so you can get the eagle-eye view from any direction. In fact, the machine practically runs itself at the maximum speed of 1000 stitches with a patented thread break detection system so you never have to skip a stitch.
The Ricoma EM-1010 is undoubtedly the choice of embroidery enthusiasts because of its affordability and versatility. Even more appealing is the choice of the finest servo motor that promises durability for years to come.
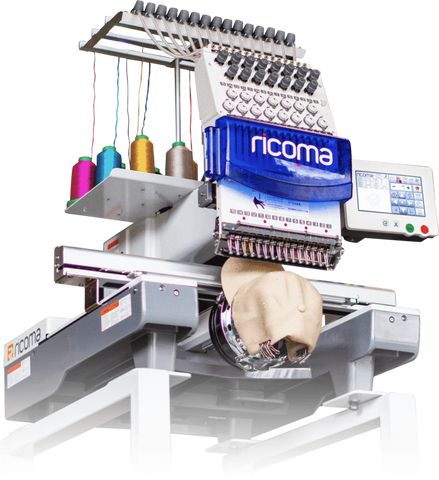
Ricoma RCM-1501
-
Heads 1
-
Needles per head 14
-
Maximum stitches 1200 SPM
-
Maximum embroidery area 560 by 350 mm
-
Control Panel 7-inch HD LCD touchscreen panel
-
Number of hoops 11
Expand your business with the Ricoma RCM-1501. A single-head commercial embroidery machine that boasts of 15 needles and is capable of multicolor embroidering on flats, caps, denim, leather, and more. If you are ready to dive into the startup embroidery business, this portable machine bundled with 11 hoops is perfect as it allows you to create a wide range of designs.
To make navigation easy for embroidery enthusiasts, the machine is equipped with a 7-inch touchscreen panel. It has the storage for 20 million designs, some of which can be transferred into the machine through the Ethernet port. You can crank your creativity up a notch by adding 3D puff embroidery and applique using the precise one-step applique feature designed with your ease into consideration.
Another appealing feature of this sturdy and portable machine is the addition of built-in LED light so you can better focus on the area that you are focusing on. This comes quite handy when you are stitching at the maximum speed of 1200 stitches per minute.
Carefully designed keeping the minutest details into consideration for the booming startup, Ricoma RCM-1501 is the perfect tool to summon your creative angel and execute unprecedented embroidery ideas. After all, the sky’s the limit!
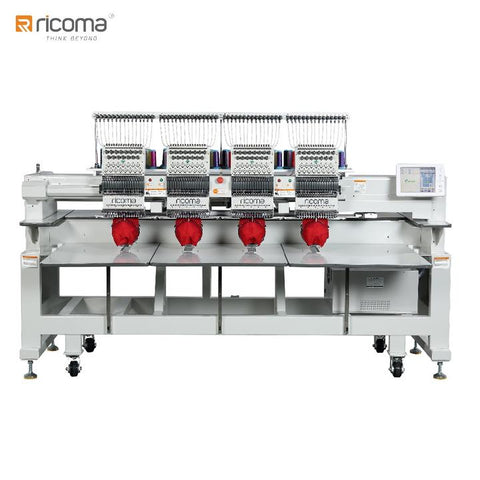
Ricoma CHT2-1504
-
Heads 4
-
Needles per head 15
-
Maximum stitches 1000 SPM
-
Maximum embroidery area 400 by 450 mm
-
Control Panel 4-inch HD LCD touchscreen panel
-
Number of hoops 10 per head
Trust Ricoma’s latest CHT2 Series to get your work done seamlessly and quickly in the first go itself. One of the models of the technologically advanced series, CHT2-1504 is a multi-head commercial embroidery machine with 10 hoops per head and is ideal for scaling the business of all sizes. From caps and flats to finished garments and bags, the machine speeds through to provide accuracy and precision.
With more machine power than ever, you will be able to maximize the effort and outcome with 4 heads. In fact, each head carries a 16” by 18” embroidery area so you can easily work on garments like jackets and bags. With the highest torque CHT2-1504 swifts through the most even the most difficult designs at the maximum speed of 1000 SPM.
That’s not all! The enhanced needle plate ensures that you do not have frequent flagging and needle breaks to interrupt your productivity. Additionally, you won’t have to hustle with inserting and removing screws from the reengineered embroidery frame positioning board. You just have to slide!
The Ricoma CHT2-1504 proudly displays the vibrant 10.4 inch HD LCH touchscreen panel with easy one-step functions in multiple languages to make stitching an absolute breeze. Equipped with dual LED lights right under the chassis and head, CHT2-1504 provides visibility in the low-light area. You can make the most of all these features and more at low power- thanks to the Servo Motor 150W.
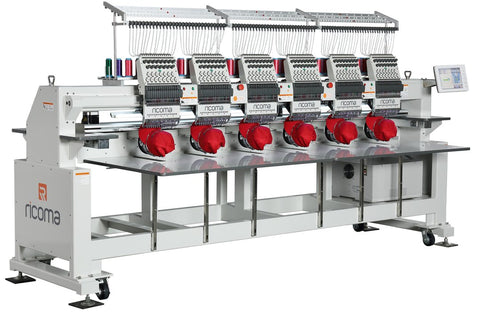
Ricoma CHT2-1506
-
Heads 9
-
Needles per head 15
-
Maximum stitches 1000 SPM
-
Maximum embroidery area 400 by 450 mm
-
Control Panel 4-inch HD LCD touchscreen panel
-
Number of hoops 10 per head
Witness beauty and functionality become one with yet another model of the CHT-2 series that’s called CHT-2 1506. With six heads, the most innovative and extremely versatile machine is designed to effortlessly create embroidery on plenty of finished garments, bags, and luggage while saving time. And with 10 hoops per head, you are all set to fulfill different embroidery needs.
The state-of-the-art Ricoma CHT-2 1506 takes pride in its 10.4-inch HD LCD touchscreen panel that’s user-friendly and intuitive. The innovation also grants you to upload embroidery pattern using a USB port on the machine that reads both DST and DSB formats.
Like all other models, CHT-2 1506 has a couple of LED lights that provide visual assistance to streamline the focus on the design. The high-speed tubular multi-head embroidery machine also has an emergency stop button and a newly developed sewing arm for the finest embroidery on caps and small items to making stitching more convenient.
Wait no more and let the industry-leading machine guide you to the optimum creative reach.
Browse our full range of embroidery machines and equipment online here:
https://www.directsewing.co.nz/collections/embroidery-machines
Or if you'd like some advice, send us an enquiry online here:
Purchasing & Payment Plans
Direct Sewing have more than 30 years of experience, with 8000+ happy customers across NZ. Please get in touch for more information about purchasing and payment plans.
PH: (09) 8388674
Cell: (021) 274 2910
Is Using a Steam Press Better Than Ironing?
Is Using a Steam Press Better Than Ironing?
Steam presses have been around for a long time. You may have used them in hotels or laundromats, but not considered them for your home or business. However, with steam presses more user friendly and compact than ever before, it’s time to rethink those wrinkles.
What's the Difference Between Pressing and Ironing?
Firstly, we are not suggesting you run into the cupboard and throw your iron in the bin. There is a reason why we all have an iron and ironing board at home. The design of the board and shape of the iron make it easy to smooth out difficult spots on every garment.
Once you’ve learnt the ropes, ironing is simple and efficient - especially if you use a steam iron & boiler set. One of the most important factors is that you’re in full control of every movement. This is especially important for garment making.
However, everything about ironing is a manual process. That’s why it’s called a chore! For stubborn creases, you’ll need to apply pressure and go over the same spot repeatedly. For a normal laundry load, this isn’t too bad. But for anyone dealing with large or regular loads, these repetitive movements can be tiring and painful.
That’s where the steam press comes into its own. Stream presses work in a similar way to an iron. They use a flat surface to apply pressure, combined with heat and steam to relax the wrinkles. However, the pressing plate in a steam press can be more than 10 times larger than an iron.
This large flat plate gives perfect results in no time at all. You can work through more garments in less time, with far lower effort than ironing.
Who Should Use a Steam Ironing Press?
Steam presses are a huge time saver for anyone who deals with large amounts of laundry. Traditionally, steam presses have been favoured by hotels, laundromats and housekeepers. They are used professionally to deliver perfect results in the shortest possible time.
However, we are seeing more semi-commercial and domestic customers getting in on the act. This includes Airbnbs, small business owners, sports teams and parents with large families. At the end of the day, if you want your time back from ironing, a steam press may be for you.
There are also some more specialist use cases. If you regularly work with loosely woven fabrics, then you may already be familiar with the ironing versus pressing argument. With tailored shirts, suits and lined garments, the act of pushing and iron back and forth is likely to distort the fabrics. It is also a common problem when quilting. Many people find that an iron distorts blocks, pleats and seams. For this reason, a switch to pressing is highly recommended.
Are Steam Ironing Presses Easy to Use?
Yes! It’s true that in the past ironing presses looked and felt industrial. However, that is no longer the case. Our entire range of steam presses are compact, economical and very user friendly.
Typical features include quick heat up, auto shut off, locking handles and removable water tanks. Steam presses are compact and easy to store, with our smallest steam press being 51cm x 20cm. They all feature simple settings for different heat, steam and fabric options, giving you complete control.
Wondering how to use a steam ironing press? It's easier than you think:
- Select your heat, steam and fabric settings.
- Lay your garment in the press.
- Lower the press for 5-10 seconds
For stubborn wrinkles, you can hold the press 5-10 cm above the garment and use the steam burst feature before pressing.
What Are The Best Steam Ironing Presses?
As with all of our product ranges, we work directly with manufacturers to provide top quality equipment at the best possible prices. We stock steam presses from Singer and Pfaff, as well as value brands for lower budgets. Here are some of our best sellers:
SINGER Mini Steam Press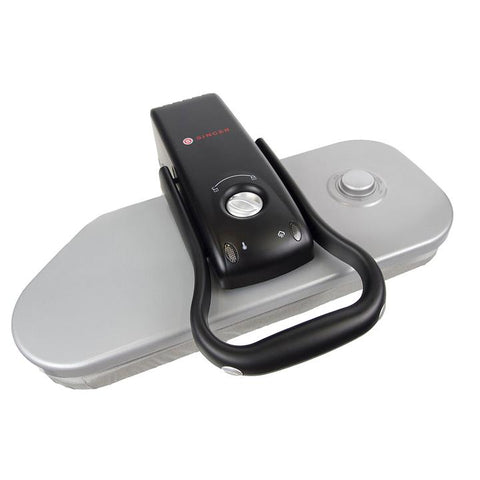
Perfect for when you’re short on space. The Singer MSP550 Mini Steam Press is very compact, but powerful.
- 20" Press Surface, 51cm x 20cm
- Professional Steam Output
- Continuous Steam and On-Demand Burst of Steam
- Non-Stick Pressing Surface Heats up to Nylon Setting in 108 Seconds
- 150ml Tank Capacity
- Automatic shut off and safety alarm
Digital Steam Ironing Press
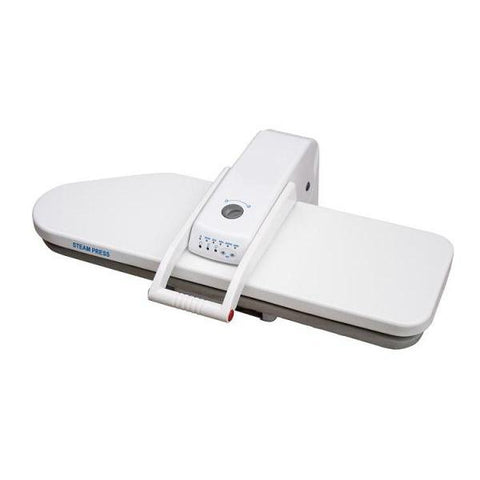
Our best value mid-size ironing press. This is a solid, high quality machine that will easily remove all your wrinkles and creases.
- 60cm x 25cm pressing plate
- Multiple material and temperature adjustments
- Continuous and steam burst options
- Quick heat up time
Singer Large Steam Press

The Singer ESP36 Large Steam Ironing Press is a top of the range press, with the features and quality you’d expect from Singer. This press will deliver perfect results time after time.
- Large 36” (91.44cm) non-stick pressing surface
- Digital controls for accuracy
- 5 fabric settings
- Continuous and steam burst options
- Quick heat up time 1.8 minutes to nylon setting
- Auto shut off and alerts
Pfaff 560 Rolling Steam Ironing Press
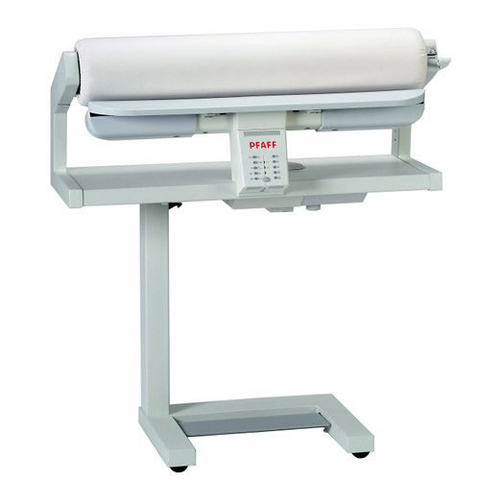
It doesn’t get any better than the Pfaff Rolling Steam Press. This is our top of the range press, perfect for Airbnbs, hotels, housekeeper, laundromats and more.
- Powerful press for bedding, furnishings and large items
- Easy to use presets for different fabrics
- Full control of roller speed, steam and pressure via foot pedal
- Built in water softener
- Collapsible for easy storage
- Wheels for easy movement
Ready to make the switch to an ironing press? View our full range online here
Our New Website is Live!
We' really happy to release our new website and hope you love it as much as we do! If you have any feedback or suggestions, please let us know by emailing us at info@directsewing.co.nz